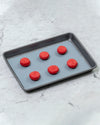
Silicone baking mats, also sometimes referred to as silicone baking sheets or silicone baking liners, have become a staple in modern kitchens. These thin, flexible mats made from food-grade silicone offer a versatile and reusable alternative to traditional parchment paper or aluminum foil, providing a non-stick surface for all kinds of culinary creations.
Understanding how to use a silicone baking mat effectively can revolutionize your baking and cooking experience, making your time in the kitchen more efficient. Let’s discuss!
Are There Different Types of Silicone Baking Mats?
Silicone baking mats are available in a variety of sizes and types to fit different baking pans and can generally withstand high temperatures up to 450°F. Some mats come with measurements and guidelines for precision baking, while others may have textures or patterns to enhance airflow and heat distribution.
What Should You Look for in a Silicone Baking Mat?
When selecting a silicone baking mat, it is essential to consider certain key features that can impact its performance and durability. Look for mats that are FDA-approved, BPA-free, and food-grade safe. Opt for mats that are appropriately sized for your specific baking pans and that offer temperature resistance suitable for the types of recipes you plan to prepare.
What Are the Benefits of Using Silicone Baking Mats?
Let’s chat about why you should be using a silicone baking mat:
Heat Distribution and Regulation
One of the primary advantages of using silicone baking mats is their excellent heat distribution and regulation properties. These mats ensure even heating throughout your baking tray, helping to prevent burnt edges or unevenly cooked food.
By providing a consistent temperature across the surface, silicone baking mats contribute to perfectly baked goods every time.
Non-Stick Properties
Silicone baking mats are renowned for their exceptional non-stick properties. The smooth surface of the mat eliminates the need for greasing or flouring your baking trays, making it easier to remove food without any sticking. This feature saves time and effort and promotes healthier cooking by reducing the need for added fats or oils.
Eco-Friendly, Reusable, and Cost-Effective
While silicone baking mats may have a higher upfront cost compared to disposable alternatives like parchment paper and aluminum foil, they offer long-term cost savings. With proper care and maintenance, a quality silicone baking mat can last for years, providing a budget-friendly baking solution in the long run.
By investing in a silicone baking mat, you reduce waste generated by disposable baking materials and contribute to a more sustainable kitchen practice since these mats can be washed and reused multiple times.
How To Prep a Silicone Baking Mat
Now that you know why you should be using one of these useful baking tools, let’s get it ready for use:
Cleaning and Washing Instructions
Before using your silicone baking mat for the first time, wash it thoroughly with warm, soapy water and rinse it well. This step removes manufacturing residues and ensures a clean surface for baking.
After each use, wash the mat with mild soap and water, taking care to avoid abrasive cleaners or scouring pads that could damage the silicone surface.
Preheating the Oven
When using a silicone baking mat, it is important to preheat your oven to the desired temperature before placing the mat inside. Preheating ensures even heat distribution and helps prevent any abrupt temperature changes that could impact your baking results. Follow the recommended preheating temperature for the recipes you are preparing to achieve optimal baking outcomes.
Ensuring a Proper Fit in the Baking Tray
Before placing your ingredients on the silicone baking mat, ensure they fit snugly on the baking tray or sheet. The mat should lie flat without any wrinkles or creases, as this could affect the baking process. Properly fitting the silicone baking mat in the tray helps maintain its position during baking and promotes even heat distribution for consistent results.
How To Use a Silicone Baking Mat
Using your silicone baking mat properly is the key to getting the best results and ensuring safety in the kitchen:
Step 1: Placing the Silicone Baking Mat
When using a silicone baking mat, start by ensuring that it is flat and securely placed in your baking tray or sheet. Smooth out any wrinkles or folds to create a uniform surface for baking. The silicone mat should fit snugly within the tray to prevent it from moving around during the baking process.
Step 2: Using the Silicone Baking Mat
You’ll want to check the temperature resistance of your silicone baking mat to ensure that it can withstand the heat required for your recipe. Most silicone mats are safe to use in ovens up to 450°F or higher.
Silicone baking mats are versatile and can be used for various types of food, including cookies, pastries, roasted vegetables, and more. Experiment with different recipes to explore the full potential of your silicone baking mat.
Step 3: Cleaning and Storage
After each use, wash your silicone baking mat with warm, unscented soapy water. To prevent damage to your silicone baking mat, avoid using sharp knives, forks, or other utensils directly on the surface. Instead, opt for silicone, plastic, wooden, or silicone-safe, non-abrasive tools when cutting or removing food from the mat to avoid scratches or tears.
To maintain the longevity of your silicone baking mat, store it flat or rolled up to prevent creases or bends. Ensure that the mat is completely dry before storing it to prevent mold or mildew growth.
What Recipes Are Best Suited for Silicone Baking Mats?
Silicone baking mats are ideal for a variety of cooked meals, offering a non-stick surface and excellent heat distribution for consistent results. Here are some recipes that are best suited for using a silicone baking mat:
- Cookies and Pastries: Bake perfectly golden cookies and flaky pastries on a silicone baking mat without worrying about sticking or burning.
- Roasting Vegetables: Achieve perfectly roasted vegetables with crisp edges by using a silicone baking mat to prevent sticking and ensure even cooking.
- Baking Fish and Meats: Cook fish filets, chicken breasts, or other meats on a silicone baking mat for a juicy and flavorful result.
What Mistakes Should Be Avoided With Your Silicone Mat?
Like most tools and gadgets, silicone mats will perform their best and give you great results when you follow best practices. Sometimes, what you don’t do is just as important as what you do, so here, we’ll look at some common mistakes to steer clear of.
Not Using a Baking Sheet or Tray Underneath
Even though some mats seem sturdy enough to hold baked goods or foods on their own during cooking, they do require a surface for support. This keeps food from spilling or dripping onto the oven and also ensures the easy and safe removal of hot items that could otherwise topple off the mat.
Skipping the Deep Clean
Silicone naturally expands in heat, making it absorb oils and fats during cooking. While it might seem that dish soap alone cleans the greasiness, over time, a residue can build up. You can scrub your mat with a lemon cut in half and then soak it in hot water for about 10-15 minutes. Then, lay it flat to air-dry.
Using a Mat With Cuts or Tears
A lot of silicone baking mats contain fiberglass because of its ability to evenly distribute heat. This is safe because the fiberglass fibers are embedded in the silicone, where they cannot come in contact with your food.
However, cuts or tears let the fibers escape, where they can contaminate your food or become airborne. This is why it’s best not to use sharp tools on your mat (unless it’s a version made for cutting) and to always discard a mat with cuts or tears.
Soaking the Mat in Soapy Water
Silicone can absorb odors, which includes the smell of your dish soap if you let it soak. To prevent your next batch of cookies from tasting like soap, you should opt for fragrance-free dish soap.
Another effective method is to wet your mat and sprinkle it with baking soda so a paste forms. Let it sit for about 10-15 minutes, and then wash it with hot water and air dry it, lying flat.
You can also use a two-to-one ratio of hot water and vinegar with about a tablespoon of salt for every quarter-cup of vinegar. Your mat can soak in this solution for about an hour, followed by a wash with unscented soap, hot water rinse, and air drying.
The Takeaway
Your silicone baking mat can help you add convenience, efficiency, and sustainability to your cooking routine and discover firsthand the joy of hassle-free baking, easy cleanup, and delicious results.
At GIR, we’re dedicated to providing top-notch kitchen solutions for the modern home cook. Visit us online today to explore our silicone baking mats and expansive line of functional kitchen tools that will help you “get it right” in the kitchen. We hope our thoughtful products make cooking and baking delicious meals and treats a joyful experience for you!
Sources:
21 Eco-Friendly Ideas for Cleaning with Lemons in Your Home | Better Homes & Gardens
The Pros and Cons of Silicone Cookware | Center for Environmental Health
8 Ways to Clean With Vinegar | Food Network
Clever Ways to Use Baking Soda for a Cleaner Kitchen | House Digest


